
Observation #2: Enemy behavior is procedural and therefore highly predictable.
BSF can be played with 1-5 players. If there are four or fewer players, each player takes turns controlling the enemy units. If a fifth player is involved, he controls the enemy units throughout the game. During my first few expeditions, I made the mistake of treating the enemy units as if they were really being controlled by a human player, in part because our fifth player, Michael, cheered for them and laughed maniacally whenever they attacked us.
However, even if a fifth player is involved, his actual control of the units is very limited. The behavior of hostiles is governed by strict rules based on dice rolls. The human player only has freedom of action to break ties in the case of two equally permissible moves. He can’t make the units do whatever he wants. This restriction provides a tremendous advantage.
Tip #2A: Keep your team together and send your tank out to draw fire.
All enemy units will always approach and attack the nearest enemy, unless two players are equally close. As a result, you can and should employ techniques that would be suicidal if you were playing against a human opponent. For example, let’s imagine that a glass canon like Pious Vorne is only two hexes away from an entire squad of Traitor Guardsmen. There’s no need to have her retreat. Just walk UR into the hex adjacent to the guardsmen. They are now required to attack UR even though a human player would walk right past him and annihilate the weaker target.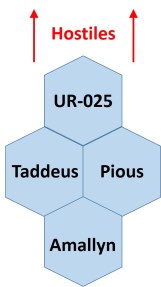
These game mechanics suggest a very reliable formation shown in the figure to the right: UR-025 should be placed in the point position closest to the enemy units. Mid-range characters, like Taddeus or Pious, should be placed in the two hexes directly behind UR. Long-range characters, like Amallyn or Raus Ratling, should be placed in the back. UR will draw not just most but all of the enemy fire while the rest of your team mows down units at their preferred distance.
Difficulties: the main problem with this strategy is the possibility of facing attackers on all sides. In particular, some combat scenarios are designated as ‘ambushes.’ Ambushes usually take place on very small maps where the players occupy a central room surrounded on three sides by groups of enemies. Additionally, during ambushes, all the enemy units are placed in front of all the heroes on the initiative track, allowing them to attack first. We’ll say more about the importance of the ‘gambit’ action later, but let’s first talk more generally about how to deal with attacks on multiple fronts.
In these situations, the heroes need to turn a multi-front attack into a one-front attack as quickly as they can. Usually, the easiest way to accomplish this is to choose the weakest group of enemy units and rush into their room, killing as many of them as possible in melee combat while ignoring the other enemies. Leave UR at the entrance to absorb attacks and then sit behind him and snipe the enemies as they come to you.
Another possibility is to send your secondary tank towards the second group of hostiles to draw fire from your weaker characters. Use this approach only when absolutely necessary because of Tip #1; only UR can heal grievous wounds and even a good secondary tank will not have this ability.
A final important warning is that players should be careful of enemy reinforcements. If any enemy group is totally destroyed and rolls to reinforce, they will appear at the portal nearest to a player. If they have in line of sight on a player, they will attack -if possible- or advance. To minimize the chance of taking grievous wounds: 1) make sure that your back-line players are always at least three hexes from a portal when the reinforcement of an eliminated hostile group is possible so that melee characters will not be able to immediately attack, 2) keep all back-line characters out of sight of portals, or 3) place back-line characters under cover so that they will not take grievous wounds if attacked.
Tip #2B: force the enemy to walk through traps.
Pious Vorne and Dahyek Grehk can lay down firewalls or traps that either injure or immediately kill most enemies who walk over them. If your opponent were a human, they would simply walk around these traps to avoid damage. However, enemy units are required to take the shortest path to the nearest player. Consequently, you can often predict exactly which hexes they will traverse on their turn. Use this knowledge to your advantage.
For example, if a squad of Traitor Guardsman has to traverse a narrow bridge to reach your team, send Pious Vorne out in front of the bridge to lay a flamewall on two consecutive segments of the bridge before falling back to her team. The enemy units will be forced to march through two burning hexes.
A possible exception occurs when a fifth human player is controlling the Fortress and when two paths are equidistant to the explorers. Only then will your opponent have the option of choosing the less-dangerous path. However, careful team and trap placement can usually guarantee that the enemies have to run a gauntlet of firewalls and explosions to reach you, much less attack you.
One final suggestion: Pious Vorne’s and Dahyek Grehk’s traps should be used in different ways. Pious’ firewall stays active from the moment she activates it until the beginning of her next turn. Consequently, you can keep her firewall active longer by deliberately moving her to the end of the initiative cycle so that she moves last. Also, the nature of Pious Vorne’s firewall makes it more appropriate for attacking large groups (Traitor Guardsmen) because it will remain active even after many hostiles have walked through it. In contrast, Grehk’s traps should be used on small groups of very dangerous hostiles (Ur Ghouls, Negavolt Cultuses) because they inflict a single grievous wound but are then immediately removed. Both traps are better used against melee enemies, because enemies with ranged attacks may shoot you from a distance rather than advancing into your trap.
Top: Introduction: Gameplay overview
Back: Observation #1: Only grievous wounds matter.
Next: Observation #3: Reinforcement is a rare event.
Related articles:
